Contents
- DIY drone: Lesson 1. Terminology.
- Do-it-yourself drone: Lesson 2. Frames.
- Do-it-yourself drone: Lesson 3. Power plant.
- Do-it-yourself drone: Lesson 4. Flight controller.
- Do-it-yourself drone: Lesson 5. Assembly.
- Do-it-yourself drone: Lesson 6. Performance check.
- DIY Drone: Lesson 7. FPV and Distance.
- Drone with your own hands: Lesson 8. Airplanes.
Introduction
In Lesson 5, you had to finish assembling the drone (without installing propellers). Take your time, as even small mistakes can lead to a crash. You still have a few steps before your first flight, so be patient and follow the guidelines below. As in the previous lesson, we will continue to assume that you use radio control equipment to interact with the UAV (as the most widely used control method at the present time).
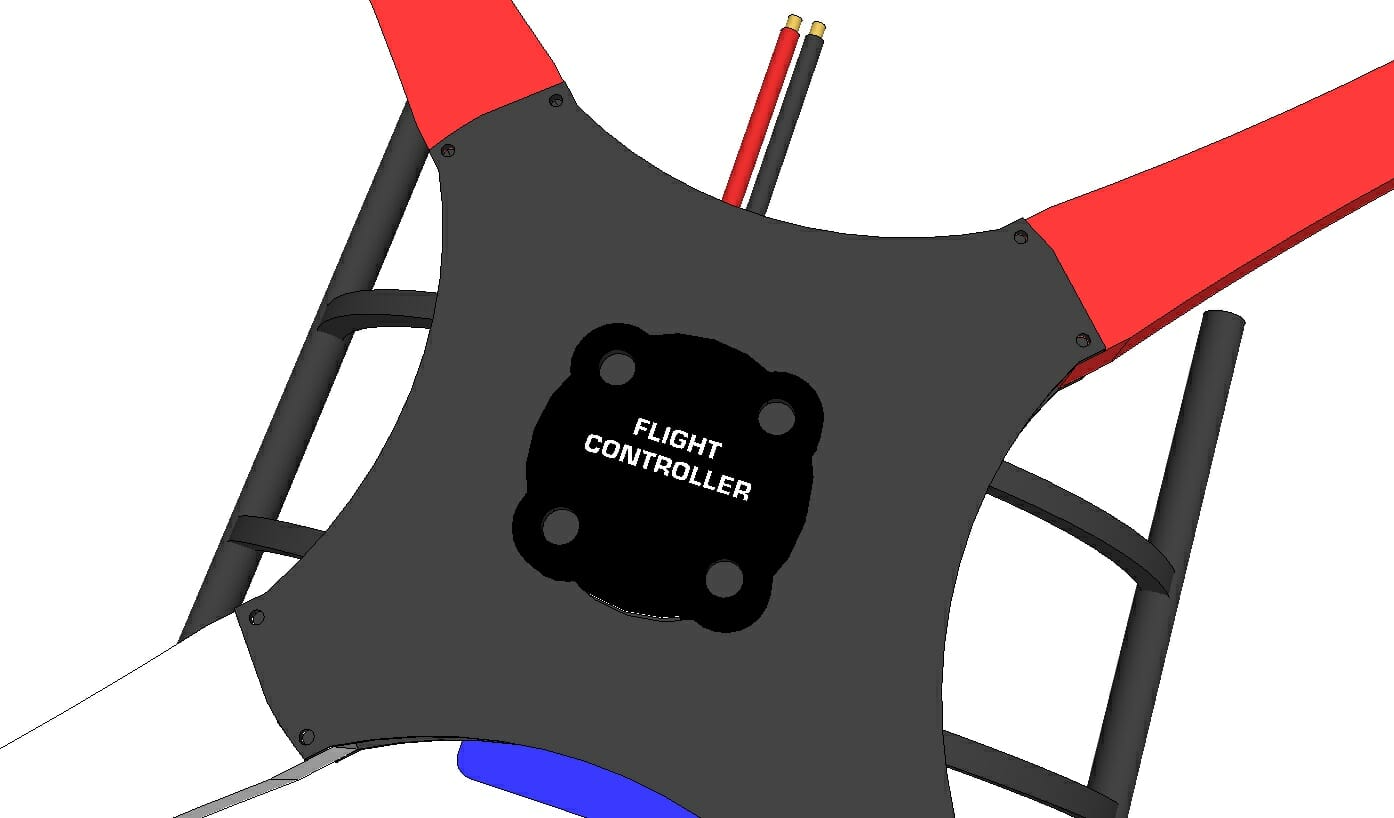
Flight Controller
- Not all flight controllers are the same, so the setup procedure really depends on the model you choose. If you haven't already, take the time to thoroughly read the user manual of the selected flight controller from start to finish. Omitting the smallest detail can make the difference between a first successful flight and a complete write-off. A well-written user manual should include everything you find on this page and more, so it is recommended that you use this tutorial as a checklist and not as a replacement / alternative to the basic developer instructions.
- Most flight controllers provide a step-by-step procedure for selecting settings for a specific UAV configuration, including full control over PID values. The values for each (P, I and D) can be adjusted for your specific frame and flying style; from something more stable for platform use in aerial photography, to something more similar to sports flights (flips, drone racing, etc.). It usually starts with the default values for each field, and if you don't have enough experience to change them, it is recommended to leave everything as it is until the first flight.
- The flight controller manual should also indicate how to set the minimum RPM of the powerplant, that is, set the speed at which the motors rotate when they are loaded. Initially, you can set this value relatively low - just enough to see the engines spinning, but not so much that the UAVs are moved by the thrust they generate. The maximum thrust, if you can set this value, should correspond to the maximum value that the throttle stick of your control gear can provide.
- One aspect that may be discussed in the flight controller's user manual without making any suggestions is the flight mode. Returning to Lesson 4, "Flight Mode" determines which sensors are used to stabilize the drone, as well as its function / purpose. The most common sensors found on a flight controller are gyroscope, accelerometer, barometer, compass, and possibly GPS.
- If this is your first drone, it is highly recommended to have the most stable flight mode available to your flight controller, which uses the most sensors available to stabilize the drone. In general, this is because the PID controller settings may be too far from your frame / settings, which is why it is best to choose the default PID controller values. If you've flown before, ACRO mode (which only uses the gyroscope) may be the best.
- Most flight controllers will also allow you to change the “flight mode” in flight via a backup channel. For example, if your remote control has six channels, you might consider assigning channel 5 or 6 (which are often associated with switches) so that you can change the flight mode while flying the drone. Before flying, make sure you know which switch position corresponds to which flight mode.
- It is strongly discouraged to use GPS hotspot flight or any more sophisticated functions / sensors (for example, an ultrasonic distance sensor to determine the distance to the ground) until you are sure that the UAV is well tuned. Some manuals suggest using only the ACRO (acrobatic) mode, however, if you do not have significant flying experience, flying in this mode will be physically impossible for you, the mode is the most difficult to control, since stabilization is excluded.
Configuration of control equipment
- Some consoles have different modes of operation, such as Airplane, Helicopter, Car etc. In 4 (Section: Control) we discussed the four main control channels: Throttle, Yaw, Pitch and Roll, which are usually values associated with aircraft or helicopters. If the manual for the flight controller does not specify a specific mode for the transmitter, it is recommended to use the Airplane mode.
- There are two types of remote control: Mode 1 (Mode 1) and Mode 2 (Mode 2). Mode 2 (most common) with this type of control is Throttle and Yaw associated with the left channel / stick / joystick, Pitch and Roll with the right. You can also double-check their assignment by moving the sticks directly to make sure the values are not inverted.
- Transmitter modes often add channel / signal “offset” levels to make movement more suitable for a particular system, however most flight controllers care about any offset and, as such, prefer "raw" values. If your transmitter does not have any modes, just check which channel / stick / joystick is responsible for which.
- A general purpose RC transmitter can only provide a limited range of signals on each channel, and therefore in this lesson we advise you to find out what range of values an RC transmitter can provide and whether the minimum and maximum values can be adjusted (or as values, or as a percentage of the default range). For example, MultiWii based flight controllers require transmitters that can provide a full range of pulses from 500ms to 2500ms, while the default setting can only be 1000ms to 2000ms as this is a common configuration for R / C aircraft. Read your transmitter manual to find out how to set signal endpoints / range (if applicable).
- If your controller has an LCD display, you can often do this through the interface under “Settings”.
- “Test of control equipment at max. Distance ”is easiest to implement with the help of a friend / assistant, or connect a buzzer or other visual / audible feedback to the RC drone. Some higher end models have a range test function. The goal of the test is to see how far the signal travels before the receiver can no longer pick it up. It is recommended to use the range test only after the so-called "Fight flight" (Fight flight - the drone is tested for performance at a short distance, within the line of sight of the pilot-drone). Range Test Procedure:
- Turn on the control equipment, then the aircraft.
- Step back 15 meters and activate the switch associated with the buzzer; You must hear him.
- If you do not have a buzzer, turn on the aircraft and make sure the engines are running.
- Silence the buzzer / rearm the drone
- Repeat these steps further and further (line of sight) until the drone responds to your input.
- This will be the absolute maximum distance at which you can fly your drone.
- You might think you don't plan to fly it that far, but remember that the drone is moving in three axes and something might go wrong.
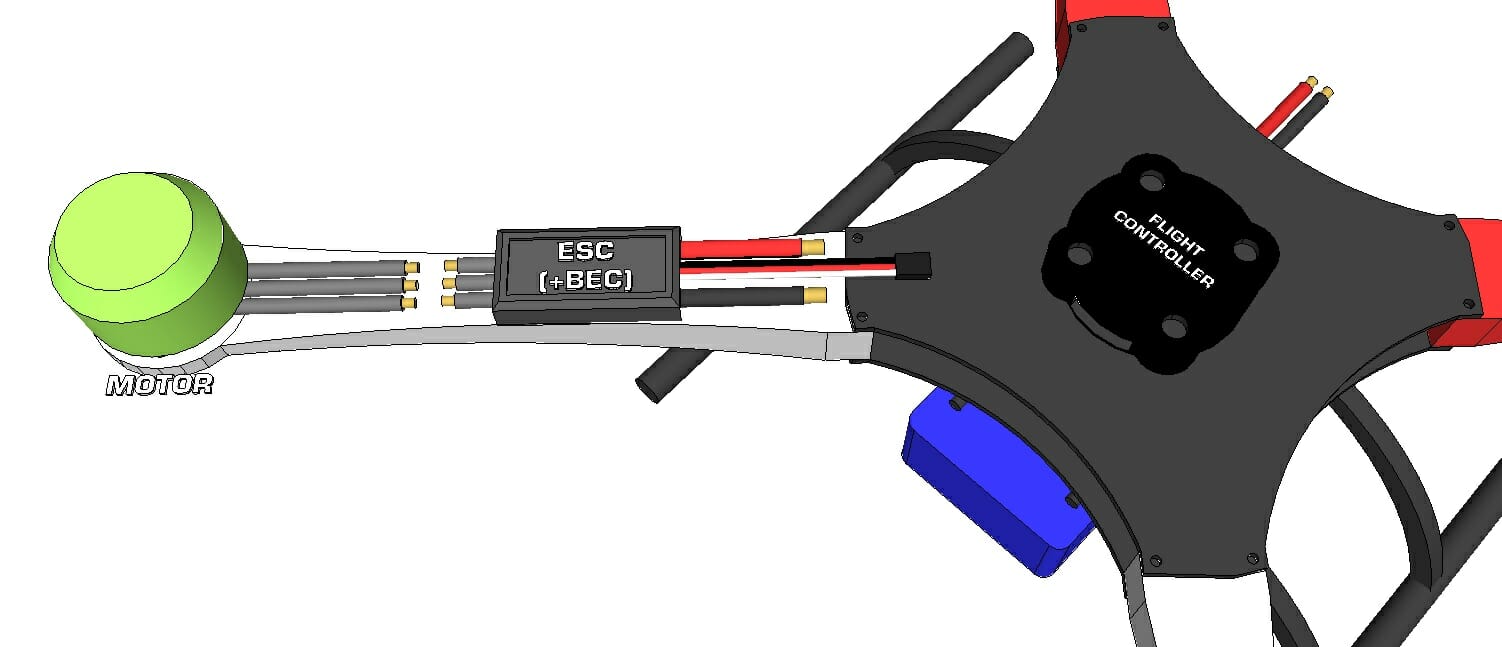
ESC Calibration
ESC will work out of the box, but the signals (PWM / PWM) associated with the minimum and maximum throttle may not match what provides your transmitter. Therefore, you need to "train" each ESC with the required values. Make sure propellers are not mounted on motors. Refer to the user manual of your flight controller. After reprogramming, the ESC retains its current configuration even when it is not powered. Therefore, each ESC is programmed only once, during the initial test / setup.
Usually there is a section in the flight controller manual that explains how to calibrate the ESC and explains how to do it. If not, you can try one of the methods suggested below. Once again, if you haven't removed your propellers yet, it's time to do so.
Transmitter
- Connect one ESC to the “Throttle” pin on your receiver. If your ESC does not have a BEC connected, you can connect one BEC-enabled ESC to another pin on the receiver (such as the battery input) simply to supply power to the receiver.
- Connect the ESC to the appropriate motor (if not already connected).
- Set the stick / joystick associated with “Throttle” to maximum (usually the left stick / joystick and full forward / up), then turn on the transmitter.
- Connect the LiPo battery to the power distribution board or directly to this ESC (if the connectors are compatible).
- The engine should beep three times (11.1V LiPo) followed by a short pause followed by two short beeps (which is the maximum beep).
- Immediately after short beeps, move the Throttle stick / joystick to the lowest position (which is the minimum beep).
- The engine should beep three times (11.1V LiPo) followed by a long beep.
- The throttle range for this ESC is now set, move on to the next one until all ESCs have been calibrated.
Other Methods
Follow the instructions in the product user manual to match the minimum / maximum input range of the ESC with what it will receive from the transmitter.
- USB: Some ESC models are programmable via USB, either independently or with an adapter.
- Programming Board: External ESC Programming Board, can be used with almost any ESC and is a stand-alone device.
- Microcontroller: This method is not widely used, but it is certainly possible to reprogram the ESC with a microcontroller if you have the correct code and can connect correctly.
- Flight Controller: Some flight controllers allow you to calibrate or program ESCs through their programming interface. Read the instructions for your flight controller to see if this is possible.
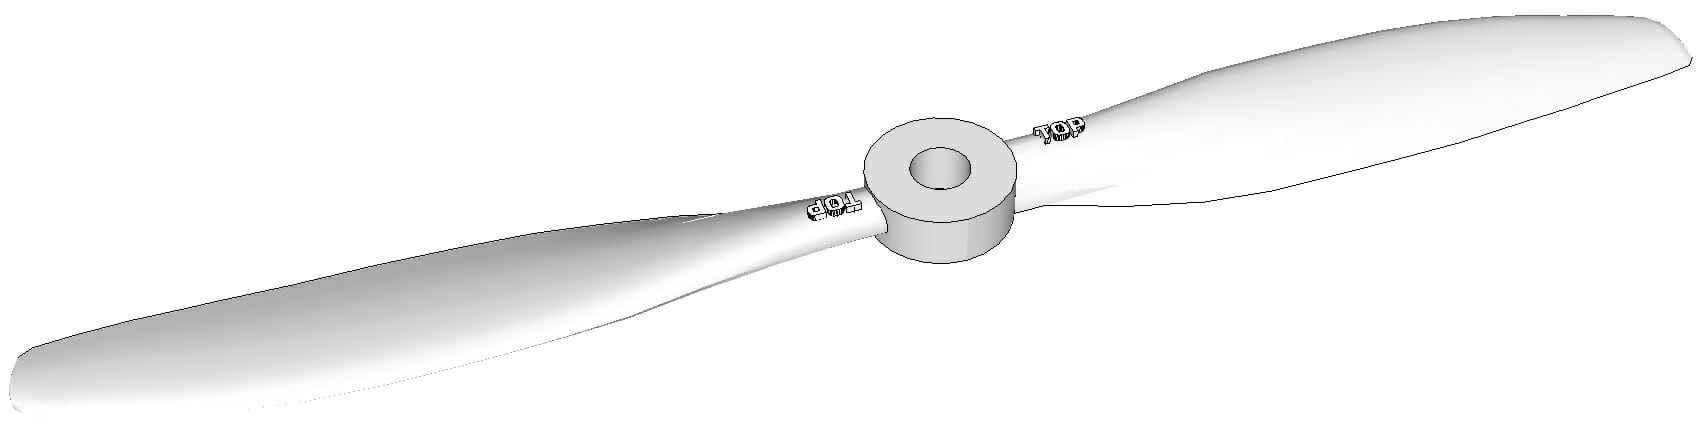
Motor and main rotor (propeller). Direction.
You are now ready to install the propellers. Let's go back to 3 lesson, which discusses the direction of the main rotor to create thrust. All propellers have a top and bottom, and a CW (clockwise) and CCW (counterclockwise) direction of rotation. There is usually text at the top of a prop indicating its height and diameter. When the propeller is mounted on the motor shaft, this upper portion points towards the sky, regardless of whether the motor is mounted on the top of the drone beam or at the bottom of the drone.
Pilot Preflight Checklist
Although the drone is not as complex or dangerous as a real commercial aircraft, you - as a pilot and must have a pre-flight checklist to make sure that the upcoming flight will not endanger people or property. The list below covers only the essentials and must be performed before each flight (not only before the first).
- Make sure you have any of the visual aids available to tell which side of your drone is in front. At a minimum, add colored tape to the two front beams.
- Make sure the control equipment battery is charged.
- Shake the UAV lightly - nothing should loosen, rattle, or fall to the ground. You will never know what may have been displaced or broken as a result of a hard landing on a previous flight.
- Make sure the propellers are still securely attached.
- First turn on the control equipment, then power the drone (keep your hands away from the rotors).
- Make sure you can reliably arm and rearm the motors (they should spin at low RPM when “Arm” and stop spinning when “Disarm”)
- Make sure you calibrate or the sensors are good calibrated (you must do this regularly)
- Check the range of the transmitter.
- Make sure the flight area is completely clear and if anyone is within it, let them know, especially curious children; that you are flying the UAV, and that you should not approach until the drone has landed with the motors completely stopped.
Testing
Until you gain sufficient confidence in your abilities as a pilot and drone designer, the following procedure is suggested for everyone unmanned aerial vehicles before their first flight.
- Turn on the engines and make sure they rotate in the correct directions as described in the flight controller manual.
- Raise the Throttle stick / joystick very slowly and make sure the propellers are pushing the air down towards the ground. Using tissue paper is a safe option for visual inspection.
- Move the Pitch stick / joystick very carefully forward / backward to make sure the drone tilts forward / backward correctly.
- Very carefully move the Roll stick / joystick to each side to make sure the drone responds correctly.
If the drone is not behaving properly, there are many possible causes, among which the most common are:
- One or more motors are rotating in the wrong direction.
- The flight controller was not installed correctly and what it considers "forward" is different from your physical UAV.
- One or more contacts between the receiver and the flight controller are not connected correctly or even in the wrong place.
- Perhaps everything is set correctly, just too quickly or too abruptly to respond to user input.

Emergency Plan
just starting to work in the field and / or with a new drone. The list below is intended to give you things to think about and some ideas on how, and why, to respond to aspiring pilots. The decision is made on a case-by-case basis, and in some situations it may contradict what is proposed here. So get to know yourself, get to know your surroundings, and be careful! In almost all cases, it will be better to lose the drone than to risk colliding with people or property.
The drone is very far away and you don't know which direction it is.
- Reduce the throttle and observe if the drone responds (checks if there is communication).
- If the drone responds to gas, try landing right there (if you can).
- If this location is not suitable for landing, carefully try to steer the drone forward (nothing drastic), and if the drone reacts by relying on your position, moving left or right in the sky will allow you to determine its orientation. If it doesn't seem to be moving left or right, it may be moving towards you or away from you, so undo what you just did and try scouring left.
The drone suddenly veers sharply off course (with or without reason).
- If you are not proficient in piloting (to try to restore it), throw off the throttle completely and let it drop: in this case, contemplating radical action may lead to the fact that you lose sight of the drone or, even worse, the drone will begin to climb to fall from a greater distance.
The drone is moving rapidly towards people.
- Gas to maximum so that it gains altitude and flies over them; your drone will probably still be in the correct general orientation, so it is better to lose the drone than fly into people.
- After reaching the optimum altitude, try to regain control, then position it so that it is above the clear landing area.
The drone is moving rapidly towards you.
- Gas to zero; let it ram the ground than it will fly into your head.
The drone does not respond to input from the control equipment.
- In that case, there is nothing you can do. If your drone is still in the air, your remote controller batteries could be depleted.
The drone loses the propeller.
- Loss of a propeller affects both thrust and yaw; try to straighten the yaw first (you probably need to hold the stick / joystick connected to the yaw, in the extreme position), and then simultaneously carefully move the throttle / throttle stick up to prevent a collision, then the throttle down.

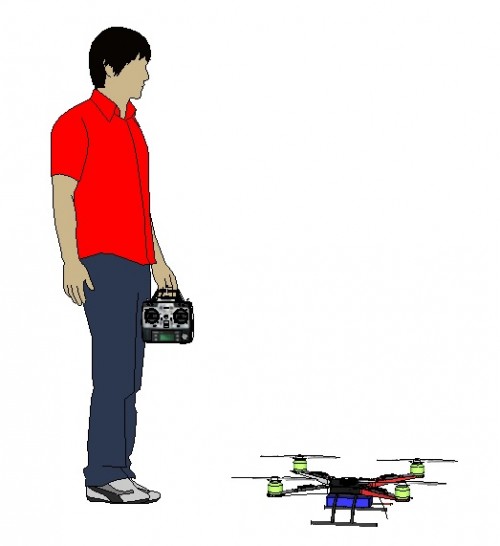
First flight
Regardless of your previous flying experience, your first flight, especially with a custom multi-engine UAV, should be as discreet as possible. The purpose of the first flight is to make sure everything is set up correctly; as well as identifying any serious problems.
- Location: open area, away from buildings, people and property. For example: an empty soccer field, baseball field, and so on would be ideal. There shouldn't be any wind at all.
- Go through the pilot's preflight checklist.
- Stand about 2 meters away from the drone with the front of the drone facing away from you.
- Arm the motors.
- Gently move the throttle stick / joystick up. Reach the point where the drone is ready to take off. There may be some ground effects that cause the drone to bounce slightly, but don't worry.
- Add throttle to get the drone off the ground and get used to the controls - try to keep it within a certain radius and see how it reacts to your stick / joystick movements.
- Make small, gradual and fluid movements — nothing too sudden. Lower the throttle stick to prevent an accident.
- If your drone does not behave as expected (for example, moving the "Pitch" axis leads to its pitch, as well as roll left or right), something is wrong, and you will have to find out the causes of the identified problems...
- If the drone behaves as expected, your task is to steadily hold its position at a height of 1.2-2 meters from the ground. Don't get too mad so fast.

.Additional flights
Now that you have worked out glitches and fly comfortably in a controlled environment, you can proceed with the second flight.
- Since the drone is still not fully tested, we suggest going through the full pre-flight procedure for the first flight, which should not take long.
- Using smooth movements, get used to how the drone reacts to your stick / stick movements by keeping it at a safe distance.
- Adaptation to piloting a drone should be done without the help of FPV and various sensors.


